Showing posts with label FreeBSD. Show all posts

Thursday, March 24, 2011

Run your own unix webserver part3

I imagine thousands, if not millions, of inquisitive geeks out there with their FreeBSD servers ready to go. Apache, PHP, and MySQL are installed, and they're just waiting , wondering..."Now What?"

Well the wait is over, my furry little geek friends. Cancel your World of Warcraft membership and do what real men do - run a UNIX web server.

In this lesson, we configure Apache and serve up a PHP page.

This document assumes: This document also assumes that:
  • at least one domain name points to your server
    The one I'm using is example.com. Replace that with your domain in the references below.
  • your server has at least one static IP address
    The one I'm using is 10.20.111.2. Again, replace my example IP with your real IP below.
Let's go...I promise this will be quick.

Make a home for your website


SSH to your server as the user 'web' and create the website root directory:
mkdir ~/www/example.com

Make a homepage for your site


You can later go back and upload a better site, but for now, we'll just make a quick PHP-driven index page in the website root directory.

Use vi to create and open the index file:
vi ~/www/example.com/index.php
Add the following content:
Save and quit vi. Good. We have a web directory and a home page.

Edit Apache's configuration file


We need to tell Apache where the new site is. I prefer using name-based Virtual Hosts

Use vi to create and open Apache's config file, called httpd.conf:
vi ~/apache/conf/httpd.conf
Scroll to the bottom and add the following. (Remember, replace my example domain and IP with your real ones)
NameVirtualHost 10.20.111.2:80 # ------------------------------------------------------------------- # # example.com # ------------------------------------------------------------------- # DocumentRoot /home/www/example.com ServerName www.example.com CustomLog "|/usr/local/apache/bin/rotatelogs /usr/local/apache/logs/example.com.log 604800" combined DirectoryIndex index.php index.html index.htm ServerName example.com Redirect / http://www.example.com/

Start Apache


Starting and stopping apache requires SuperUser (root) privileges, so type su, and enter root's password.

In case the web server was already running, we'll try and stop it first. If you get an error about apache not running, don't worry...
apachectl stop
Before starting or restarting Apache, I test any configuration edit's I've made.
apachectl configtest
You should get, Syntax OK.

Finally, start the server:
apachectl start
In the future, after making Apache configuration changes, restart the server like this:
apachectl configtest apachectl graceful
That gracefully stops the server, re-reads the configuration, and starts up again.

Launch Party


Open up your favorite browser and go to the site!

If it worked, submit your site to Google, jump out of the nest, and flap your wings. You're on your own now!

Run your own unix webserver part2

Earlier this week we installed FreeBSD. Now we'll install some software to host your own website(s).

This document assumes:
  • FreeBSD is already installed
  • you have SSH access to the server
  • you've create a system user named, 'web', running the csh shell
  • your home directory is /home/web
  • you have root access; root also runs csh
  • your comfortable with commandline text edits using VI or VIM
All the above are covered in Part 1 of this series

Formatting Coventions & Notes


# Lines starting with '#' are comments. # Just read them; Don't type them This is a command that should be typed into the terminal
I recommend leaving FTP disabled (FreeBSD's default). FTP is not nearly secure as SFTP or SCP. Almost any modern FTP client is capable of SFTP and the SFTP daemon runs by default on FreeBSD.

You'll also notice that we're compiling all the software from source files, either by downloading the source (PHP, Apache, MySQL) or getting it via FreeBSD's ports system.

I prefer to compile my software on the server, as opposed to downloading a pre-compiled binary because:
  • performance is optimized to your hardware
  • you know exactly what options are turned on or off
  • if something breaks, it's a learning experience
The user web will own PHP's config file (php.ini) and Apache's config file (httpd.conf). This is the primary user that you'll use as the webmaster of this server.

Let's go...

User Account Setup


Account Paths
Since we're compiling Apache and MySQL, we'll tell the shell where to look for those binaries. This allows you to execute short commands like 'apachectl', instead of '/usr/local/apache/bin/apachectl'.
# do the following as web AND as root vi ~/.cshrc # add the following after 'set path = (' /usr/local/apache/bin /usr/local/mysql/bin # As web, open ~/.cshrc and add the following: set prompt="% "

Install A Web Browser And Python


# as root: cd /usr/ports/ftp/wget make install cd /usr/ports/lang/python make install
Now you can download source files like this: "wget http://server/path/file.tar.gz";

Download Source


Get the latest source for:
  1. Mysql
  2. Apache
  3. PHP
For each application, download the *.tar.gz source file.

First, I'll make a /src directory in my home. Then I'll use the websites above to find the URL for the latest source file and download the tar.gz directly on the web server with wget:
wget http://us2.php.net/get/php-5.1.2.tar.gz/from/this/mirror
# as web: mkdir ~/src ~/src/tars cd ~/src # download source wget [mysql source] wget [php source] wget [apache source] # uncompress source tar xvfz mysql* tar xvfz php* tar xvfz httpd* # move compressed source to ~/src/tars # in case we need them later mv *.gz tars
Now you're home directory should look like this:
/home/web /src/ /httpd.../ /mysql.../ /php.../ /tars/ /httpd...tar.gz /mysql...tar.gz /php...tar.gz

MySQL


# as web: cd ~/src/mysql* ./configure --prefix=/usr/local/mysql \ --without-debug \ --with-extra-charsets=none \ --enable-local-infile \ --enable-assembler make # become root su make install ./scripts/mysql_install_db /usr/local/mysql/bin/mysqld_safe --user=root & # Create the MySQL start up script vi /usr/local/etc/rc.d/mysql.sh # add the following to your new, blank file echo -n "Starting MySQL Server"; /usr/local/mysql/bin/mysqld_safe --user=root & # write/quit vi chmod 700 /usr/local/etc/rc.d/mysql.sh # exit out of root
Now load MySQL and setup the root password and the mysql account. You will still have to set up entries into the db table at a later time to allow access to databases for the mysql user.

Replace ROOT-PWD with a password that you want to use for MySQL's root user.
/usr/local/mysql/bin/mysql -u root mysql> UPDATE mysql.user SET password = PASSWORD('ROOT-PWD') WHERE User='root'; mysql> UPDATE mysql.user SET user = 'mysql' WHERE User=''; mysql> FLUSH PRIVILEGES; mysql> exit
Create a user options file for root. This file will contain root's mysql password so he can auto log in.
su vi ~/.my.cnf
Enter the following text into the .my.cnf file.
Change "ROOT-PWD" to the password you used for MySQL's root user.
# Add the following # Example mysql config file. # You can copy this to one of: # /usr/local/mysql/etc/my.cnf to set global options, # mysql-data-dir/my.cnf to set server-specific options (in this # installation this directory is /usr/local/mysql/var) or # ~/.my.cnf to set user-specific options. # # One can use all long options that the program supports. # Run the program with --help to get a list of available options # This will be passed to all mysql clients [client] password = "ROOT-PWD" #port = 3306 #socket = /tmp/mysql.sock # # Here is entries for some specific programs # The following values assume you have at least 32M ram # # The MySQL server [mysqld] #port = 3306 #socket = /tmp/mysql.sock #skip-locking #set-variable = key_buffer=16M #set-variable = max_allowed_packet=1M #set-variable = thread_stack=128K set-variable = max_connections=200 set-variable = ft_min_word_len=3 # Start logging #log # #[mysqldump] #quick #set-variable = max_allowed_packet=16M # #[mysql] #no-auto-rehash # [isamchk] #set-variable = key_buffer=16M set-variable = ft_min_word_len=3 [myisamchk] set-variable = ft_min_word_len=3 [mysqld_safe] time_zone = EDT
Chmod the file
chmod 700 /root/.my.cnf

PHP DEPENDENCIES


# as root, run 'make install' in the following directories cd /usr/ports/security/libmcrypt make install cd /usr/ports/security/mcrypt make install # make install in all the following: cd /usr/ports/ftp/curl cd /usr/ports/databases/freetds cd /usr/ports/textproc/libxml2 cd /usr/ports/textproc/aspell cd /usr/ports/textproc/libxdiff

APACHE 2.X / PHP 5.X


More PHP/Apache2 install info

Apache 2.x
Download apache - http://httpd.apache.org - and install with 'shared-object' (so) support
# as web: cd ~/src/httpd-2* ./configure --prefix=/usr/local/apache \ --with-mpm=worker \ --enable-so \ --enable-cgi \ --enable-info \ --enable-rewrite \ --enable-speling \ --enable-usertrack \ --enable-deflate \ --enable-ssl \ --enable-mime-magic \ --enable-module=expires \ --enable-module=proxy make # as root: make install
PHP 5.x
# as web: cd ~/src/php* ./configure --with-apxs2=/usr/local/apache/bin/apxs \ --with-mysql=/usr/local/mysql \ --enable-calendar \ --enable-trans-sid \ --with-curl=/usr/local \ --with-sybase=/usr/local/freetds \ --enable-ftp \ --with-mcrypt \ --with-pspell \ --with-xdiff make # For new installs, create blank references for the config owned by 'web' # Become root touch /usr/local/lib/php.ini touch /usr/local/lib/php.ini.bak chown web /usr/local/lib/php.ini* # as root: make install # copy the config file cp php.ini-dist /usr/local/lib/php.ini chown web /usr/local/lib/php.ini*
Now PHP and Apache are installed. We still need to edit apache's config file to parse PHP.

Edit httpd.conf
vi /usr/local/apache/conf/httpd.conf # look for "AddType"; add the following three lines # PHP AddType application/x-httpd-php .php AddType application/x-httpd-php-source .phps # Remove the default deny access configuration by # searching for and # commenting out "Deny from all"
Start Apache
apachectl start # Create the Apache start up script vi /usr/local/etc/rc.d/apache.sh # add the following lines to your new, blank file echo -n "Starting Apache Web Server"; /usr/local/apache/bin/apachectl start & # write/quit vi chmod 700 /usr/local/etc/rc.d/apache.sh

PEAR / PHP Modules


PEAR is a repository of helpful PHP classes. They can be installed with the command line tool, pear
# install stable classes # by deault, pear installer deals with stable classes # become root su pear install Mail_Mime pear install PhpDocumentor # install the BETA Excel Writer because it rocks. pear remote-list # if you don't see 'Spreadsheet_Excel_Writer', it's still beta # set pear to beta mode pear config-set preferred_state beta pear remote-list # now you should see Spreadsheet... pear install OLE pear install Spreadsheet_Excel_Writer # change back to stable state pear config-set preferred_state stable # exit from root exit

Ports


You'll need to be root to install these helpful system maintenance applications
# 'make install' for the following cd /usr/ports/graphics/ImageMagick cd /usr/ports/net/cvsup cd /usr/ports/net/cvsup-without-gui cd /usr/ports/sysutils/portupgrade cd /usr/ports/net/rsync

Post Installation


Make directories, links, set permissions
# www directory mkdir /home/www ln -s /home/www /usr/local/ # make 'web' own some apache files chown -R web /home/www /usr/local/apache/cgi-bin /usr/local/apache/conf/httpd.conf # links for web's home dir ln -s /usr/local/apache /home/web/apache ln -s /home/www /home/web/www

Mail


Set up web and root's accounts to forward to you. Mail to the web server (nobody) should be deleted
# as root vi /etc/mail/aliases
add the following lines: As root, rebuild your mail aliases by typing
newaliases

What's Next


That'll do it for now. Go get some coffee. Open a window and breath some fresh air.

In part 3, we'll configure everything and get a website up and running.

ENJOY!

Run your own unix web server part1

Setting up and running a Unix web server is surprisingly easy. Recently, on del.icio.us, I ran across the article Become Your Own Web Host in 75 Steps. Without too much explanation, the article describes how to install FreeBSD, MySQL, PHP, and Apache. Hopefully the following series will expand on that article and go a little deeper.

We will be installing:
  • FreeBSD (STABLE)
  • MySQL
  • Apache
  • PHP
  • and some other apps helpful to webmasters
Before we start, you'll need
  1. 1 blank CD
  2. A CD burner
  3. A computer with an ethernet card
  4. An Internet connection with a static IP address

Download FreeBSD


Your new webserver can be any old, cheap, Intel-based box, as FreeBSD will run on any old piece of crap.
  1. First, make sure your computer is compatible
    • Go to the FreeBSD Releases page
    • Check Hardware Notes for the Stable Release
    • Make sure your hardware is compatible with that release. I can almost guarantee that it is...
  2. Download FreeBSD
    • Go to the FreeBSD home page
    • Follow instructions for downloading the production/stable release
    • Download just the disc1.iso ISO image
  3. Burn the iso to your blank CD

Boot up Install CD


Now you should have:
  • 1 FreeBSD ISO CD
  • 1 computer (with a network card) ready to be transformed into a web server
Let me warn you that FreeBSD's installer is more old school than my VHS copy of Wild Style. But like Wild Style, it never gets old.

Installer Notes:
  • Use the arrow keys to move
  • Use space to select
  • Use enter to execute/select
  • Don't use the number pad; stick to the regular number keys
...Ok, let's go:
  1. Boot up
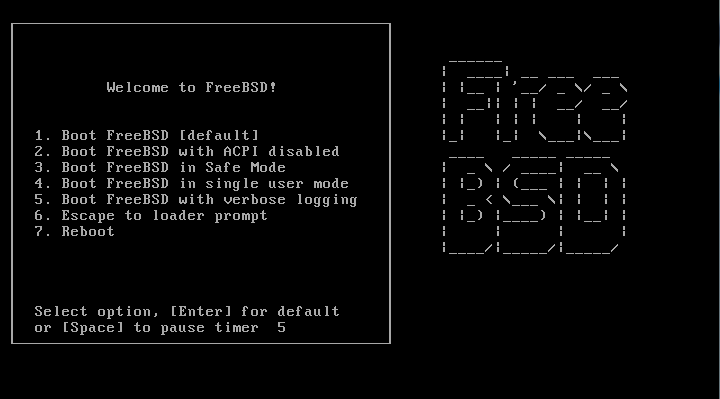
    Put your freshly burned CD into the soon-to-be webserver and turn it on. If all goes well you'll see the FreeBSD daemon asking you what you want to do
  2. Select the default option: Boot FreeBSD
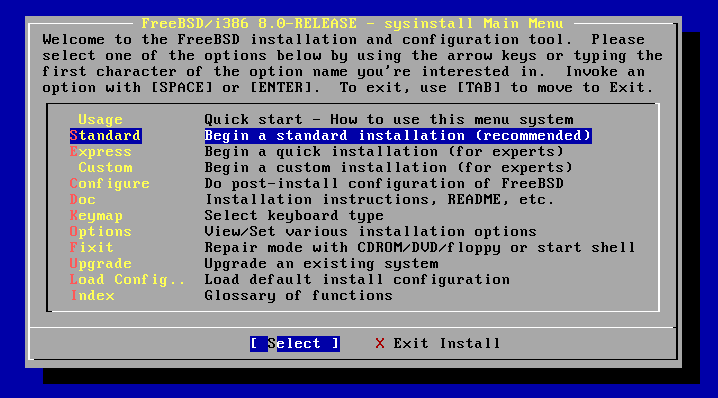
  3. Use the arrows to select Standard - Begin Standard Installation, then hit Enter

The FreeBSD Installer


  1. Select Standard, hit Enter
  2. Use arrow keys to delete all current partitions: D deletes current partition; A uses entire partition; Q when you're done
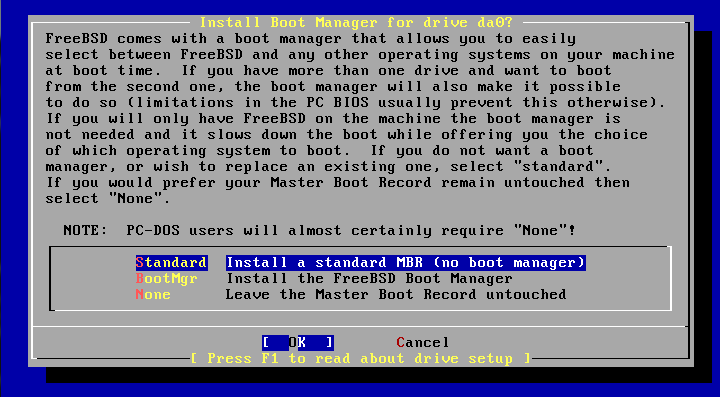
  3. Boot Manager Select Boot Mgr, hit enter
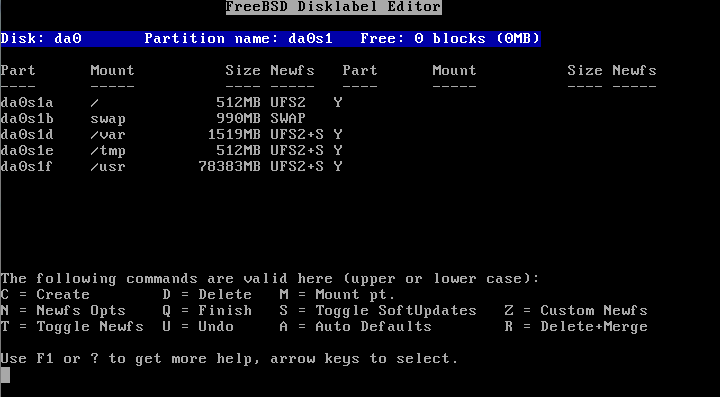
  4. Disk Label Editor: Create disk partitions: Type C to create a new partition. Create custom partitions, something like below. Create the partitions in this order:
    2GB FS Mount Point: /
    1GB SWAP
    1GB FS Mount Point: /tmp
    1GB FS Mount Point: /var
    10GB FS Mount Point: /usr
    [all remaining] FS Mount Point: /home

    The 2nd partition (SWAP) should be 2x the amount of RAM installed. Partitions /, /tmp, and /var can stay rather small (use the defaults above) no matter how big your HD is.

    Type Q to finish
  5. Select Distribution Choose All
  6. Ports Collection Yes you want the ports skeleton (you'll go back to the Select Distribution screen. Scroll up, select Exit
  7. Installer Source Select CD/DVD
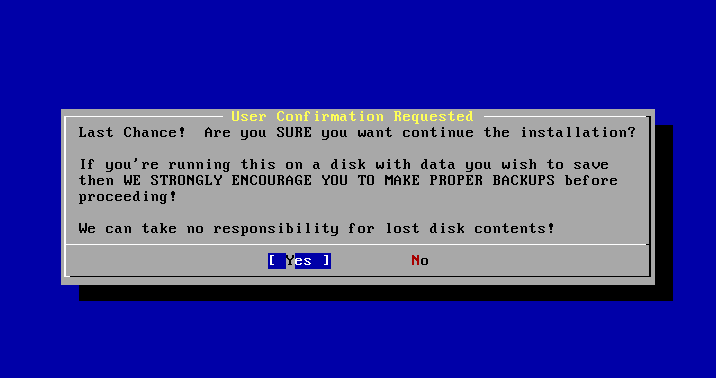
  8. Last Chance Hell, yeah. Delete everything, reformat the HD, give me some BSDLove
FreeBSD creates the filesystems that you named in the Disk Label Editor, and begins installing stuff. During the installation, you can see what's going on in a number of different views:
ALT-F1 - default GUI view
ALT-F2 - verbose installation log
ALT-F4 - emergency interactive shell
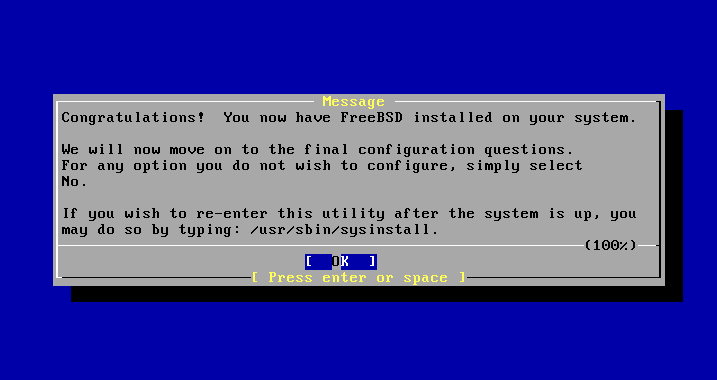
After extracting the source, and installing the source, you'll get to a screen that says:

Congratulations


Hit OK and move on...

Configuration


  1. would you like to configure any ethernet or SLIP/PPP network devices? Yes
  2. Select Your Network Card Select the first option unless you're sure your network card is one of the other options
  3. try IPV6? No
  4. try DHCP? No
  5. Network Info:
    Host [servername] If you want your server to be "foo.example.com", enter "foo" here
    Domain example.com
    enter the rest of your net info, click OK
  6. function as a network gateway? No
  7. inetd and network services that it provides? No
  8. enable SSH? Yes
  9. anonymous FTP? No
  10. NFS server? No
  11. NFS client? No
  12. customize system console settings? Yes
    I just select SAVER and select a really retro screen saver...like snake...
  13. Set this machine's timezones now? Yes
  14. Linux binary compatibility? Yes - this should let you run compiled linux binaries through FreeBSD's emulator.
  15. Does this system have a PS/2, serial, or bus mouse? No - mice are for wimps.
  16. FreeBSD Package Collection - Browse the collection now? No - we'll add ports later on
  17. Add any initial user accounts? Yes
    Select User; hit Enter
    • Login ID: web
    • UID: [default]
    • Group: [leave blank]
    • Password: *******
    • Full Name: Web Master
    • Member Groups: wheel
    • Home Directory: /home/web
    • Login Shell: /bin/csh (I like csh better than the default, sh)
  18. Set Root's Password
  19. Visit the general configuration menu for a chance to set any last options? No
  20. Use the right arrow to select [Exit Install]
    Hit Enter
  21. Are you sure you want to exit? Hell, fricken' yes, I'm sure
Your system will restart. Remove the install CD, and behold your new FreeBSD webserver

First Startup


You'll see a verbose startup messages page across the screen. The first startup, you'll eventually be asked to create an SSH key. To do this, just type a screenful (maybe 10 lines) of random junk then hit enter.

Your system will finish booting up and eventually prompt you with:

FreeBSD/i386 (foo.example.com) (ttyv0)
login: []

Login


Log in as web and the password you made, and start familiarizing yourself with some unix commands:

Next Steps

Now you have a FreeBSD web server connected to the internet. SSH is enabled, but not FTP. More importantly, to serve web pages, you'll need to install some additional software.

In the next lesson, we'll install:
  • PHP
  • MySQL
  • Apache
  • ...and more.

FreeBSD : it's what your server want

FreeBSD is a Unix operating system that runs especially well on generic Intel-compatible hardware.

FreeBSD doesn't do anything special. In fact, anything I can do on my favorite OS, you can do on yours. So, what's so great about FreeBSD? It just works. In fact, it always works. It never stops working. After using FreeBSD on all my web servers for the past 6 years, I really appreciate how little time I spend in the server room, messing with system configurations, plugging security holes, running out of system resources, and buying new hardware just to serve up a bunch of web sites.

So here is my list of reasons why you, too, should switch your servers to FreeBSD.
  1. Stability (even on old hardware)
    FreeBSD never crashes. I run about 50 web sites, on two regular Pentium boxes (one is 700Mhz PIII).

    Each box runs a web server (Apache/PHP) and a database server (MySQL). These boxes handle about 200,000 hits/day, and are constantly serving up dynamic content.

    In the past 6 years I've restarted these web servers only a handful of times, to upgrade the OS or hardware - never because of an application or OS crash.

    Running the command 'top' usually tells me that the box is 92% - 99% idle. Memory management, and managing it's own system resources seems to be one of FreeBSD's best features.

    Proof is available on Netcraft's ongoing survey of sites with the longest average uptimes - notice the 'OS' column

  2. Ports
    The 'ports' tree is FreeBSD's software management system. Here's what I do if I hear about a cool new application that I'd like to install - in this case it's 'qmail' a UNIX mail server application similar to 'sendmail'. (The non-bold type preceded by the '$' prompt is what I would type. The bold text is the computer's response)
    $ whereis qmail qmail: /usr/ports/mail/qmail $ cd /usr/ports/mail/qmail $ make install
    The ports installer, goes out on the internet, finds the latest version of 'qmail', and any dependencies, downloads the sources, compiles and installs the application, and registers the new software in it's internal database. I can type pkg_info, and I'll see a list of all software I've installed with ports.

  3. Keeping up-to-date with CVSup
    Updating the version of FreeBSD is so easy. 'CVSup' is a software package that can be used to keep your server's OS in sync with the current version of FreeBSD. When a new STABLE version of FreeBSD is released, here's what I do:
    # Download the current source files $ cd /usr/share/examples/cvsup $ cvsup -g -L 2 stable-supfile $ rm -rf /usr/obj $ cd /usr/src $ make update $ make buildworld $ make buildkernel # Install new Kernel and reboot $ make installkernel $ reboot # Install new source $ cd /usr/src $ make installworld $ mergemaster $ reboot
    For mergemaster, I basically type 'i' for most of the files (which installs the newer configuration file). Type 'd' to keep your original config file...

    CVSup goes to the FreeBSD web site (or the nearest mirror), downloads all new source file (it's smart enough to only download source files that have changed), and then I'm ready to runa handful of commands and reboot. The only command that requires any brain cells to run is mergemaster, and possibly 'cvsup' (since you will edit the file /usr/share/examples/cvsup/stable-supfile to point to a mirror near you).

    FreeBSD, unlike some other OSs, is centralized, unified, and doesn't release a new version every two weeks, so you won't be upgrading every-other Friday afternoon. When you do upgrade, there are rarely drastic changes that require any intervention.

  4. Bonus Features:

install FreeBSD 8.2

This article is a guide to install FreeBSD 8.2 using an installation CD/DVD, please make sure you've got a FreeBSD 8.2 installation CD/DVD.

1.Starting the FreeBSD installation

Start the installation by booting up using the installation disc.

FreeBSD Installation Screenshot 1

FreeBSD Installation Screenshot 1

Press ENTER, the system will start hardware probe process and you will see lots of text messages flying by your screen.
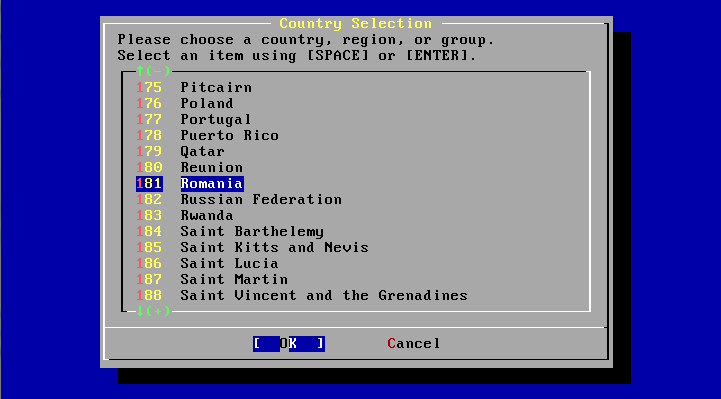
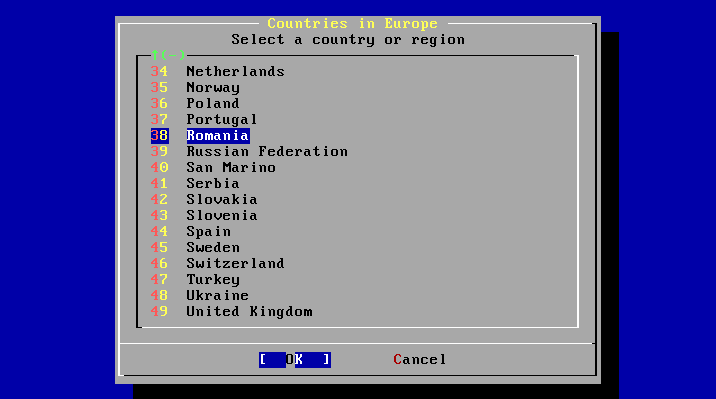
Once the installer has booted up it'll ask you to select the country, system console keymap and the type of installation you want to run. You can use the UP/DOWN arrow key to select and ENTER to continue.

FreeBSD Installation Screenshot 2

FreeBSD Installation Screenshot 2

FreeBSD Installation Screenshot 3

FreeBSD Installation Screenshot 3

We'll choose "Standard" method to install FreeBSD, it is recommended for most situations.

FreeBSD Installation Screenshot 4

FreeBSD Installation Screenshot 4

Then you'll see a message window telling you that you are about to start setting up the disk for this installation. Please press ENTER key to continue.

2. Allocating disk space

If you have more than one disk installed on your computer, you'll see a screen to prompt you to select which disk you want to set up. Press SPACE key to select the disk, use TAB key to highlight [ OK ], then press ENTER to continue.
In the screen, it will display all the information about your disk, as shown in the screen shot below. You need to choose where on the disk you want FreeBSD to be installed. Since our server is dedicated to FreeBSD, we'll press "A" here to use the entire disk and then we'll set it as bootable by pressing "S" key. When finished, press "Q" to continue with the next step.

FreeBSD Installation Screenshot 5

FreeBSD Installation Screenshot 5

Install a standard MBR (no boot manager) when prompted.

FreeBSD Installation Screenshot 6

FreeBSD Installation Screenshot 6

3. Creating partitions

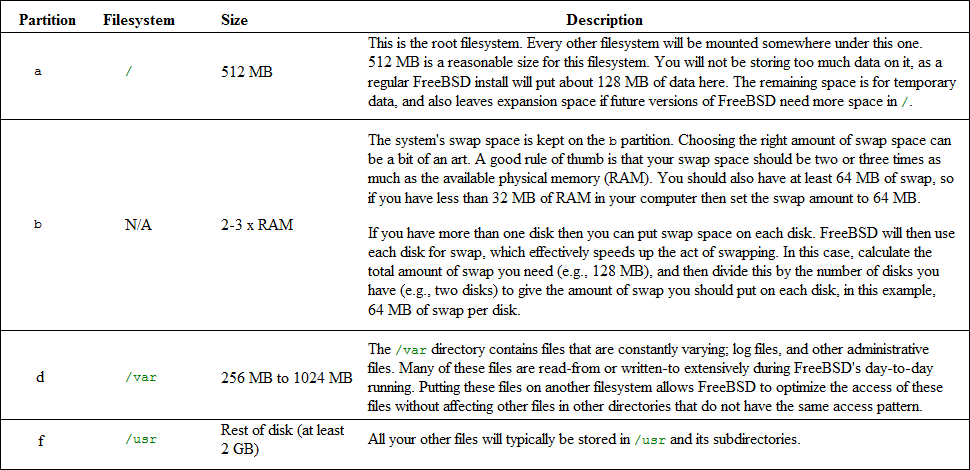
You must now create some partitions inside the slice that you have just created. Remember that each partition is lettered, from a through to h, and that partitions b, c, and d have conventional meanings.

FreeBSD Partition Layout

FreeBSD Partition Layout

Press "A" to create default layout or you can manually create the partitions if you like.

FreeBSD Installation Screenshot 7

FreeBSD Installation Screenshot 7

Press "Q" to save and continue (it'll return to disk selection if there is more than one disk on your computer).

4. Choosing What to Install and the installation media

Here you need to choose what you want to install on your system. It's recommended you to choose minimal installation.

Next screen is to choose installation media. Here we'll use the installation CD. So use the arrow keys to highlight "Install from a FreeBSD CD/DVD". Ensure that [ OK ] is highlighted, then press ENTER to proceed with the installation.

5. Committing to the Installation

Next, select [ Yes ] to confirm your choices and installation will now start, unless you want to change your choices or cancel installation.

FreeBSD Installation Screenshot 8

FreeBSD Installation Screenshot 8

Then you'll have the installation progress screen. The installation time will vary according to the distribution chosen, installation media, and the speed of the computer. There will be a series of messages displayed indicating the status. When everything is done you'll see a congratulation message saying the installation is completed.

FreeBSD Installation Screenshot 9

FreeBSD Installation Screenshot 9

Press ENTER to go the post installation configurations.

6. Post installation configurations

Configuration of various options follows the successful installation. An option can be configured by re-entering the configuration options before booting the new FreeBSD system or after installation using sysinstall command and selecting Configure.

The first one is to configure the network interface. Select [ Yes ] when prompted and then in the next screen, use arrow keys to highlight the interface you want to configure, usually the first one, then press ENTER to continue.

Use TAB to select the information fields and fill in appropriate information:

Host: The fully-qualified hostname, like myserver.example.com
Domain: The name of the domain that your machine is in, such as example.com
IPv4 Gateway: IP address of host forwarding packets to non-local destinations (also known as the default gateway or default route)
Name server: IP address of your DNS.
IPv4 address: The IP address to be used for this interface.
Netmask: such as 255.255.255.0
Extra options to ifconfig: can be left blank.

Use TAB to select [ OK ] when finished and press ENTER. When prompted if you want to bring up this interface, select [ Yes ] and press ENTER if the interface is ready, otherwise select [ No ].
If the machine will be acting as the gateway for a LAN and forwarding packets between other machines then select [Yes] and press Enter. If the machine is a node on a network then select [ No ] and press ENTER to continue.
When prompted if you want to configure inetd and the network services, select [ No ] for now, you can always change it at a later time.
When prompted if you want to enable SSH, select [ Yes ] and press ENTER so that you can login remotely in a secure manner.

You'll then be prompted for configuring some services, skip the following: Anonymous FTP, NFS server, NFS client, system console settings, Linux binary compatibility, mouse settings, install packages.

Setting the time zone for your machine will allow it to automatically correct for any regional time changes and perform other time zone related functions properly.

When asked "Is this machine's CMOS clock set to UTC?", press ENTER to keep default [ No ] and continue.

FreeBSD Installation Screenshot 10

FreeBSD Installation Screenshot 10

When asked "Does the abbreviation 'EEST' look reasonable?", select [ Yes ] and continue.

Next, you should add at least one user during the installation so that you can use the system without being logged in as root.

After you finish settings for above items, you'll be prompted to set password for root user. Choose a password that's 8 digits or more and is complex enough.

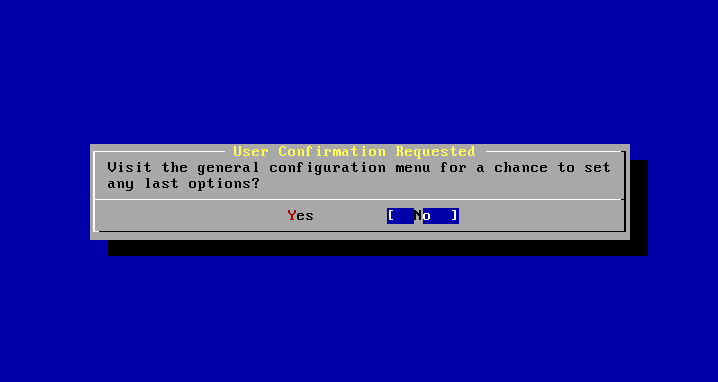
The installation will continue after the password is successfully entered. You'll then be asked if you want to visit general menu and change some other options. It's default to [ No ].

FreeBSD Installation Screenshot 11

FreeBSD Installation Screenshot 11

Press ENTER to continue.

Now installation is completed. You're back again to the main installation menu. Use TAB to highlight "Exit Install" and then press ENTER to reboot the system. Please remove install CD/DVD at this moment.

FreeBSD Installation Screenshot 12

FreeBSD Installation Screenshot 12